Configuring neovim with Lua
TL;DR use https://github.com/nvim-lua/kickstart.nvim/tree/master
I have used Neovim for a few years now, and it's the most productive text editor I use. I like to describe it as the final text editor: as far as I'm concerned, Vim's ergonomics means that no editor will exceed it, and there is only catching up to it.
One of the big draws of Neovim over Vim is the extensibility: Neovim prioritises
Lua over Vimscript, and while Vimscript is fairly well studied at this point, it
is not nearly as nice to use as Lua. I maintain a minimalist .vimrc for when I
have to use old school Vim, but otherwise my preference is to use Lua.
Vim is still worth learning, because you won't always have access to VSCode.
About Lua
Lua is a lightweight programming language, so light in fact that it can fit inside most compilers. It has a niche in embedded applications and also in scripting environments for many game engines. I have recently used Lua inside the NodeMCU environment to build remote sensors, to give another example. Another area is in web services: the lightweight Nginx web server has Lua support, which allows frameworks such as Lapis to work with the smallest barrier between the webserver and the framework. Lua has a comprehensive set of packages.
Take a look at the Showcase and you'll see where Lua's work really shines.
Here, though, we'll talk about its use in Neovim configuration and plugins.
Structuring your Neovim configuration
The entry point for neovim is either an init.lua (for Lua) or an init.vim
(for Vimscript). I prefer an init.lua because I make no pretences about
backwards compatability with vim, and this is a Neovim-specific
configuration.
~/.config/nvim
├── init.lua       <- Entry point
├── lua            <- Modules
│   └── module.lua <- Module
└── README.md      <- Documentation
Now's a good time to set up linters and formatters. I use Luacheck to lint my code, and I use Stylua to format with the following configuration:
column_width = 110
line_endings = "Unix"
indent_type = "Spaces"
indent_width = 2
quote_style = "AutoPreferDouble"
call_parentheses = "NoSingleTable"
Modular Vim setup
We have use of the vim global, which allows us to use vim.g to set global
settings. For example, this is what I use for netrw, which is a file
manager built-into Vim.
Common convention is to keep code inside a module with a .setup() function
exposed.
-- netrw.lua

local M = {}

M.setup = function()
  vim.g.netrw_keepdir = 0
  vim.g.netrw_liststyle = 3
  vim.g.netrw_banner = 0
  vim.g.netrw_winsize = 30
  vim.g.netrw_localcopydircmd = 'cp -r'
end

return M
Inside your init.lua, you can use a require to import your module.
-- init.lua

local netrw = require('netrw')
netrw.setup()
Building a statusline
Vim is somewhat famous for its statuslines. A very basic one is this:
" statusline

set laststatus=2
set statusline=
set statusline+=%#PmenuSel#
set statusline+=%#LineNr#
set statusline+=\ %f
set statusline+=%m
set statusline+=%=
set statusline+=\ %y
set statusline+=\ %{&fileencoding?&fileencoding:&encoding}
set statusline+=\ [%{&fileformat}\]
set statusline+=\ %l:%c
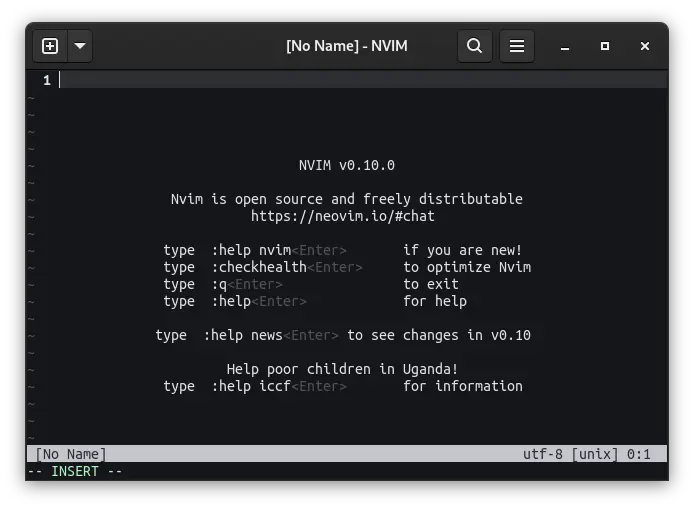
This creates a statusline that looks like this:

On the bottom, it shows the current mode, the file name, the file type, its encoding, and the position of the cursor in rows and columns. It is possible to create a fancier statusline with Vimscript, but the main benefit of Lua is that Lua is more readable and more maintainable in the long term.
-- statusline.lua

local function clean_nils(table)
  local ret = {}
  for _, v in pairs(table) do
    ret[#ret + 1] = v
  end
  return ret
end

local M = {}

M.lineinfo = function()
  if vim.bo.filetype == "alpha" then
    return nil
  end
  return "%l:%c"
end

M.file = function()
  return "%t%m"
end

M.fileinfo = function()
  local info = {
    "%{&fileencoding?&fileencoding:&encoding}",
    "[%{&fileformat}]",
  }
  return string.format("%s", table.concat(clean_nils(info), ' '))
end

M.component = function(self, text)
  if text == nil then
    return nil
  end
  return string.format("%s ", text)
end

M.statusline = function(self)
  local left = {
    self:component(self.file()),
  }
  local right = {
    self:component(self:fileinfo()),
    self:component(self:lineinfo()),
  }
  return string.format(
    "%s %s %s",
    " " .. table.concat(clean_nils(left)),
    "%=",
    table.concat(clean_nils(right)) .. " "
  )
end

M.setup = function(self, config)
  vim.opt.statusline = self:statusline()
end

return M
From this, it can be enabled by adding the following to your init.lua:
-- init.lua

local statusline = require('statusline')
statusline.setup()
There are other items that can be added to the statusline, such as Git status, or the status of the currently-active language server, but those are beyond the scope of this blog post.
Plugins
Neovim's adoption of Lua has been a fantastic boon for the plugins ecosystem. Using the Lua language and libraries allows the use of existing Lua tooling for plugins, including testing infrastructure and package management.
Installing and using plugins
There are a few options available to you:
-
A plugin manager. The most commonly recommended one is lazy.nvim, which aims to do for Neovim what vim-plug did for Vim (or what other plugin managers do for other pieces of software).
-
git-submodules.
The first one is easier to set up: just add the following to the top of your
init.vim:
local lazypath = vim.fn.stdpath 'data' .. '/lazy/lazy.nvim'
if not (vim.uv or vim.loop).fs_stat(lazypath) then
  local lazyrepo = 'https://github.com/folke/lazy.nvim.git'
  local out = vim.fn.system { 'git', 'clone', '--filter=blob:none', '--branch=stable', lazyrepo, lazypath }
  if vim.v.shell_error ~= 0 then
    error('Error cloning lazy.nvim:\n' .. out)
  end
end ---@diagnostic disable-next-line: undefined-field
vim.opt.rtp:prepend(lazypath)

require('lazy').setup({
    -- plugins go here
})
This pins versions of plugins and stores this in a lazy-lock.json file, which
allows us to keep continuity of which versions of plugins are installed.
The second does not require a plugin manager, because vim has one: packadd.
Add your plugins to ~/.config/nvim/pack/plugins/start with git submodule add. The only snag is that installing and updating plugins are a mild pain
because git submodule is a mild pain.
Both are valid-- but lazy addresses versioning concerns I used to have with the vim ecosystem's plugin management practices.
Development
I'm partial to the structure built with boilit, which uses the following:
plugin
├── autoload
│  └── health
│     └── nvim-awesome-plugin.vim
├── doc
│  ├── nvim-awesome-plugin.txt
│  └── tags
├── lua
│  └── nvim-awesome-plugin
│     ├── config.lua
│     ├── init.lua
│     └── main.lua
├── plugin
│  ├── nvim-awesome-plugin.vim
│  └── reload.vim
└── README.md
-
autoloadis code that gets executed on startup, andhealthis an optional helper that ties into:checkhealthso a user can check this plugin's configurations and whether their version of Neovim is compatable; -
doccontains documentation which can be used from inside Neovim; -
luacontains plugin library code; -
plugincontains the user-accessible API for interfaces to the plugin code inlua.
plenary.nvim contains some helpers for commonly-used functions, including support for unit tests, so you can unit test your plugin if you want.
A good example of a well-sorted plugin is Neogit, which is what I use for Git.